RigExpert interfaces are connected to the transceiver using a cable, which is designed depending on a transceiver model. We provide cable diagrams for most popular transceivers, but the interfacing device may be connected to any other type of transceiver.
A cable has a 25-pin plug connected to the device on the one end, and one or more transceiver connectors on the other end.
The sources of information for designing cables are
- RigExpert transceiver connector description
- Transceiver user manual and/or circuit diagram
- Diagrams of similar interface circuits and RigExpert cables for similar transceivers
There are several functions to be implemented in a cable:
- Audio in/out
- CAT interface
- PTT function
- CW key function
- CW paddle
- FSK function
Specific transceivers may leave some of these functions unsupported, so the first step in making a cable is to decide which functions to implement. A transceiver manual and circuit diagram contain all details about transceiver functionality as well as connector descriptions (including pinouts).
There are several consideration of designing a really good cable:
- Cable length (should be 1 to 2 meters).
- Shielding – audio in/out lines shielding is absolutely necessary, but it is better to shield all other lines, too (several lines may use a common shield).
- Minimized number of connectors
The algorithm of designing a cable is:
- Deciding which functions shall be implemented in a cable, according to RigExpert interface and transceiver-supported functionality
- Defining one ore more way each function may be implemented (i.e. finding all suitable ways to connect a specific line to the transceiver)
- Choosing the ways which minimize the number of used connectors
Audio in/out
There are several possible combinations of audio in/out connection:
- MIC_TRCVR line (audio output of RigExpert interface) may be connected to
- Microphone connector on the transceiver front panel, or
- Specialized Audio In connector (this may be RCA or 3.5mm PATCH IN connector), or
- Common socket which connects a number of other lines (this may be ACC, DATA or PACKET connector)
- SPK_TRCVR line (audio input of RigExpert interface) may be connected to
- Headphone or speaker connector, or
- Specialized Audio Out connector (this may be RCA or 3.5mm PATCH OUT or LINE OUT connector), or
- Common socket which connects a number of other lines (this may be ACC, DATA or PACKET connector)
- AGND_TRCVR line (analog ground) should be connected to the transceiver analog ground. Do not shorten GND (pins 11 and 24) and AGND_TRCVR on the 25-pin connector – this will destroy the advantage of transformer decoupling of audio lines provided by RigExpert interface.
The picture below illustrates audio in/out connection. Always use separate shields for audio input and output lines.

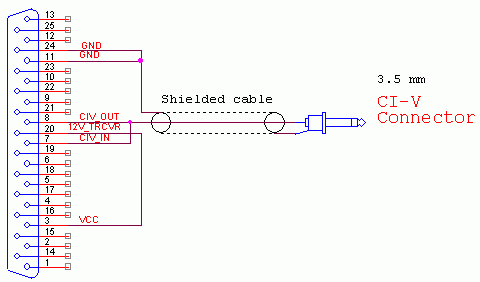
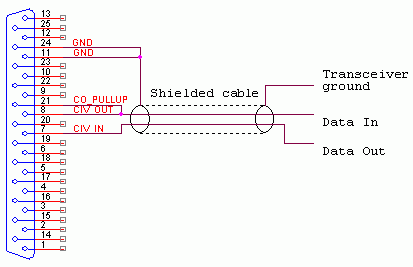
CAT connection for transceivers with CI-V interface
CI-V interface is supported by the majority of Icom transceivers. It uses a single line (instead of two lines) for CAT data in/out. Normally, a 3.5mm plug is used on the transceiver side of the cable.
- Shorten CIV_IN and CIV_OUT pins of RigExpert interface 25-pin connector, and wire this line to the center pin of a 3.5mm plug
- GND (ground) line goes to the ground pin of the 3.5mm plug
- 12V_TRCVR input of RigExpert interface should be connected to VCC (+5V output of RigExpert device), or either to any other source, including +8V or +13.5V transceiver outputs or 12V_MAX (+12V) output of RigExpert interface.
The picture below illustrates CI-V connection:
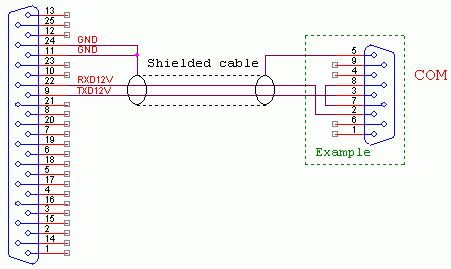
CAT connection for transceivers with RS-232-compatible CAT interface
These transceivers normally have a DB-9 connector for CAT connection.
- TXD12V is a RigExpert interface CAT output
- RXD12V is a RigExpert interface CAT input
- GND goes to transceiver ground
The steps here are as follows:
- Defining the type (DB-9 male or female) of the cable plug
- Finding the proper RXD12V/TXD12V connection (normally, these two lines are connected to pins 2 and 3 (or vice versa) of DB-9 connector)
- Finding if it is needed to shorten pins 7 and 8 (DTR and DSR lines) of DB-9 connector
The following picture shows an example of this type of connection:
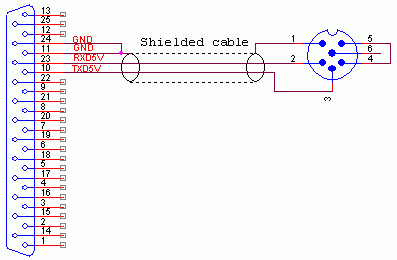
CAT connection for transceivers with 5V CAT interface (with RS-232 polarity)
These transceivers (usually, Kenwoods with 6-pin DIN CAT connector) are designed to use an IF-232 compatible interface box to connect to a computer serial port.
- TXD5V is a RigExpert interface CAT output
- RXD5V is a RigExpert interface CAT input
- GND goes to transceiver ground
The picture below shows RigExpert interface to 6-pin plug connection. Pins 4 and 5 (CTS and RTS) should be shortened for Kenwood transceivers.
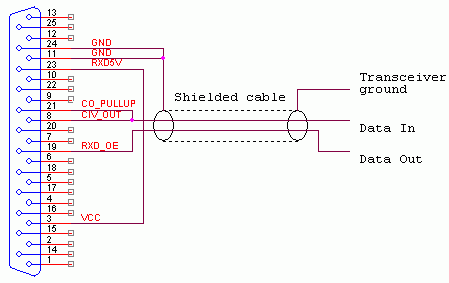
CAT connection for transceivers with 5V CAT interface (with RS-232-reverse polarity)
These transceivers include Yaesu models with (usially) MINI-DIN CAT connectors, which have an open-collector output buffer:
- Shortened CIV_OUT and CO_PULLUP become a RigExpert interface CAT output
- CIV_IN is a RigExpert interface CAT input in this mode
- GND goes to transceiver ground
The following picture illustrates this case. The CAT connector type and pinout is usually described in the transceiver manual.
Another circuit works best for transceivers with (usially) 6-pin DIN CAT connectors with open-emitter CAT output buffer:
- Shortened CIV_OUT and CO_PULLUP become a interface CAT output
- RXD_OE is a RigExpert interface CAT input in this mode
- RXD5V goes to VCC to enable the RXD_OE input
- GND goes to transceiver ground
The following picture illustrates this case. The CAT connector type and pinout is usually described in the transceiver manual.
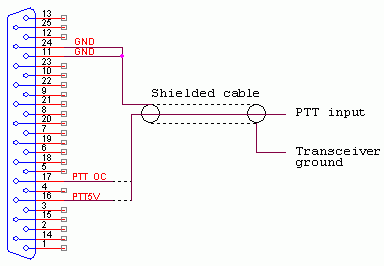
PTT line connection
Normally, transceivers need an open-collector PTT output (tied to GND to transmit). However, some transceivers may need a positive-voltage PTT. PTT line can be connected to either a separate PTT transceiver connector, front-panel microphone connector, or a multi-function socket such as DATA, PACKET or ACC.
- PTT_OC is an open-collector PTT output of RigExpert interface
- PTT5V is a positive-voltage (+5V when PTT is active) output
- GND is connected to the transceiver ground
The picture illustrates possible PTT connections:
CW KEY connection
The majority of modern transceivers provides CW key input, which is usually a 3.5mm or 6mm socket (for either stereo or mono jack – see the transceiver manual).
- CW_OC is a CW KEY output, which is tied to ground when RigExpert interface generates dots and dashes.
- GND is connected to the transceiver ground

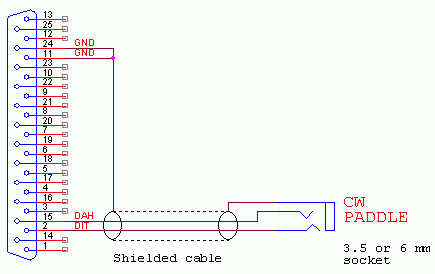
CW paddle connection
RigExpert Plus/TI-5 has a built-in electronic keyer for single or double paddle.
- DIT and DAH are inputs to be connected to ground to produce dots and dashes
- GND is a common line for CW paddle
Even though RigExpert Plus/TI-5 has a built-in CW Paddle socket, the picture below shows a CW paddle connection via the 25-pin connector. Normally, a 3.5mm or 6mm socket on the end of short shielded or unshielded cable is used to connect a paddle.
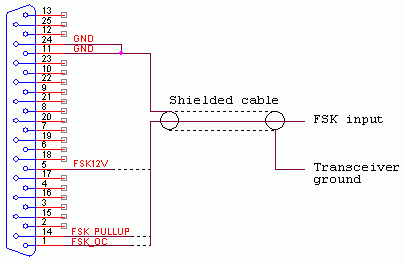
Most transceivers provide FSK input for operating RTTY. This may be a separate RCA or DIN connector on the back, or this line may be found on other common connector, such as ACC or DATA.
- FSK_OC is a RigExpert interface FSK output (open-collector, required by most transceivers)
- FSK_PULLUP (internal pull-up resistor) should be connected to FSK_OC if the transceiver needs a 5V FSK input instead of open-collector input
- In some cases, FSK12V (RS-232-compatible FSK output) may be required by a transceiver